

🦋 Changesets is a game changer

In today’s coding landscape, monorepos are all the rage. They offer a centralized, streamlined approach to managing multiple packages within a single repository.
But here’s the kicker: we often want independent versioning for these packages. If we were to do this manually, it would be a real hassle. That’s where 🦋 Changesets come into play.
By offering a clear and efficient way to manage independent versioning for packages within a single repository, Changesets has become a crucial addition to the toolkit of many developers and organizations.
Let’s dive into the magic of this technology and see how they simplify the complex world of monorepo versioning.
Project Structure
Following is the project structure of our sample monorepo. This repository contains five packages, four of which are private and one that is public. The private packages are marked with "private": true in their package.json files, indicating that they're not meant to be published to npm.
├── apps
│   ├── docs (Private)
│   └── web (Private)
├── packages
│   ├── eslint-config-custom (Private)
│   ├── tsconfig (Private)
│   └── ui (Public)
Changesets Process
Let’s take a high-level look at what really happens with Changesets. In a nutshell, a developer can open a pull request (PR) with or without a changeset. By default, a changeset is not mandatory for a PR because not all changes require a release. However, when they do want to release one or multiple packages, they can include a changeset in the PR. Then Changesets will automate the versioning and release process.
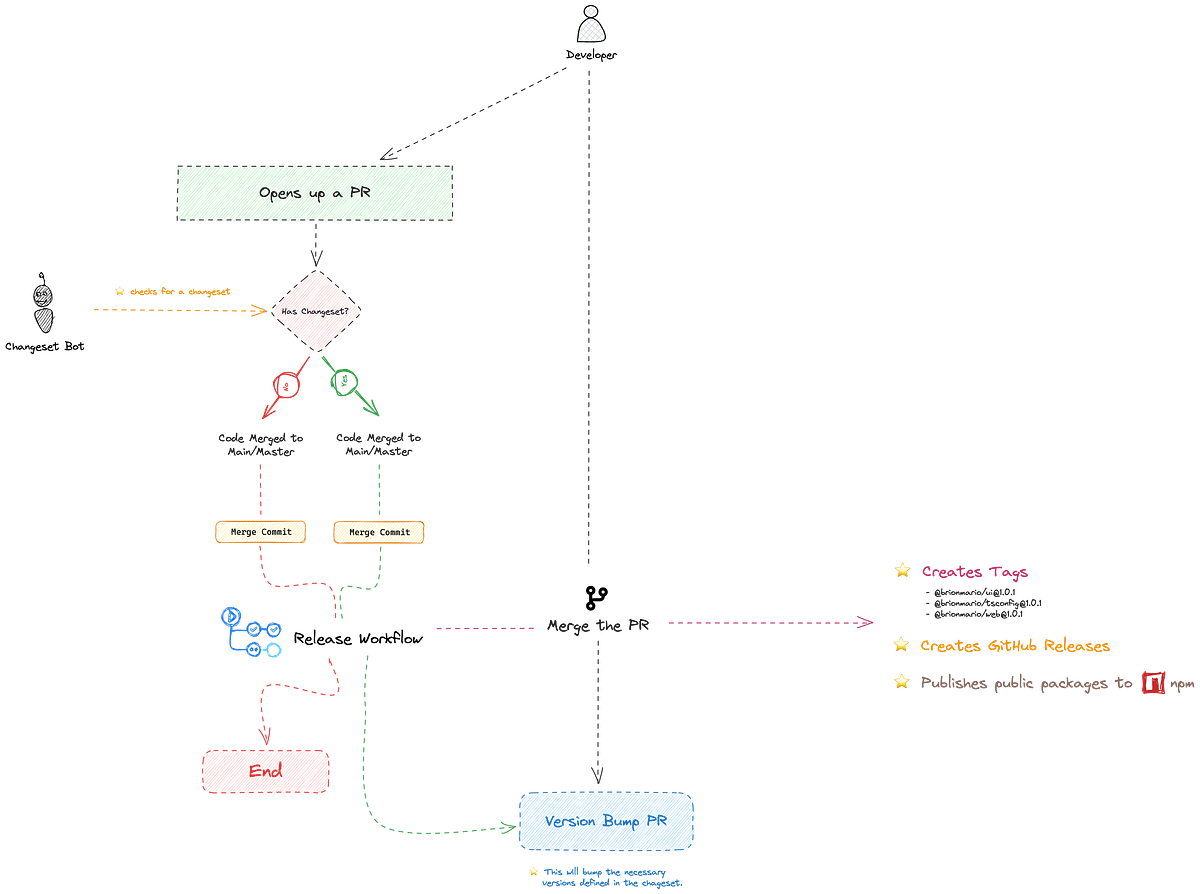
💡 If you want to delve deeper into the design decisions of Changesets, you can find a detailed explanation in the official documentation.
Lets get started 🚀
Step 01: Install the Changesets CLI
To get started, we need to install the Changesets CLI package at the root of the mono repo. If you’re using pnpm, you can use the -w flag to bypass any warnings related to adding dependencies to the workspace root.
pnpm add @changesets/cli -w
💡 For npm users, a simple
_npm install @changesets/cli_will suffice.
Step 02: Initialize Changesets
Initializing Changesets in your project is straightforward. Run the following command, and it will create a .changeset folder containing a config.json file and a README.md file.
pnpm changeset init

Step 03: Customizing the Changeset Config
By default, Changesets only publishes and versions npm-publishable public packages in the repository. However, you might want to version and tag private packages too.
To achieve this, update the .changeset/config.json file with the following configuration:
{
  "privatePackages": {
      "version": true,
      "tag": true
  },
  ...// rest
}
Feel free to tailor the config.json to match your specific requirements.
Step 04: Enhancing the Workflow with Scripts
To streamline the release process, let’s add some helpful scripts to your package.json.
"scripts": {
  "changeset": "changeset",
  "publish:packages": "changeset publish",
  "version:packages": "changeset version"
}
“changeset”: “changeset”: Execute the Changeset CLI using npm. This lets you usenpm run changesetto invoke the CLI instead of usingnpx.“publish:packages”: “changeset publish”: This publishes any unpublished packages tonpm, and creates git tags.“version:packages”: “changeset version”: Takes Changesets that have been made, updates versions and dependencies of packages, and writes changelogs. This command handles all file changes related to versions before publishing to npm.
Step 05: Add Changeset Bot to the repository
When a pull request (PR) is submitted, the Changeset bot evaluates the diff and comments on the PR if a changest is available or not.
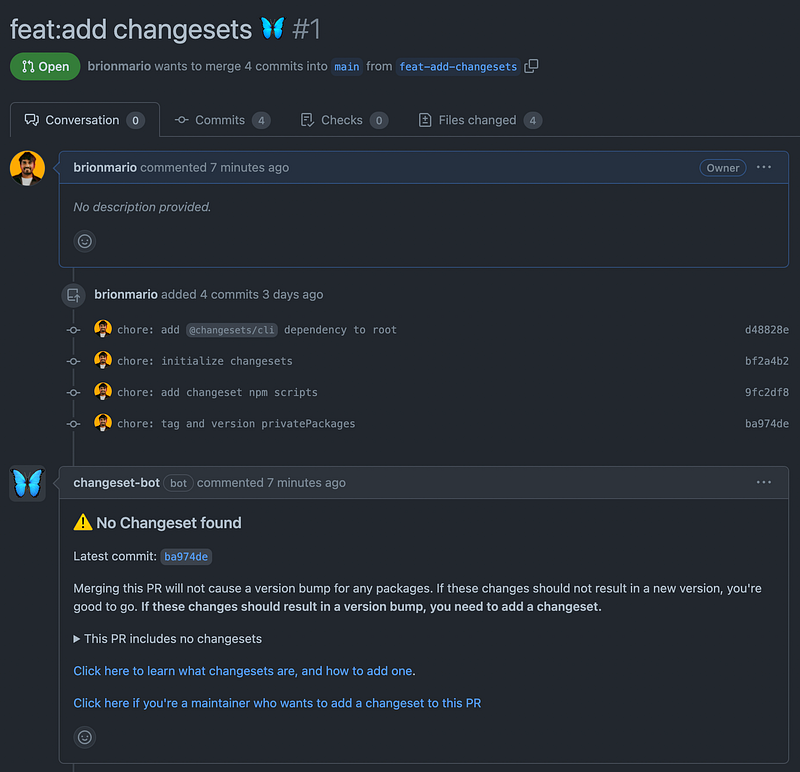
The bot is extremely useful to remind you of any pending Changesets that you might forget to add to your PR.
Step 06: Create your first Changeset
Once you are happy with your code in the PR, you can generate a changeset if you wish to release certain packages. To do this execute the folliwing command.
pnpm changeset
After the above is executed, you’ll see a set of prompts.
- First, select the package or packages you want to include in the changeset (💡 Use the up/down arrows to navigate and the space bar to select).
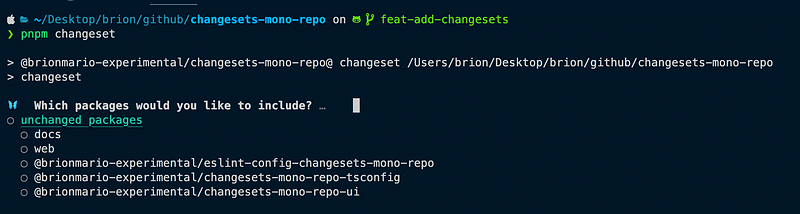
2. Next, choose the type of release you want to perform, whether it’s Major, Minor, or Patch.
3. Finally, provide a meaningful message. Keep in mind that this message will appear in the CHANGELOG of the respective package(s). Always write a message with context and meaning.
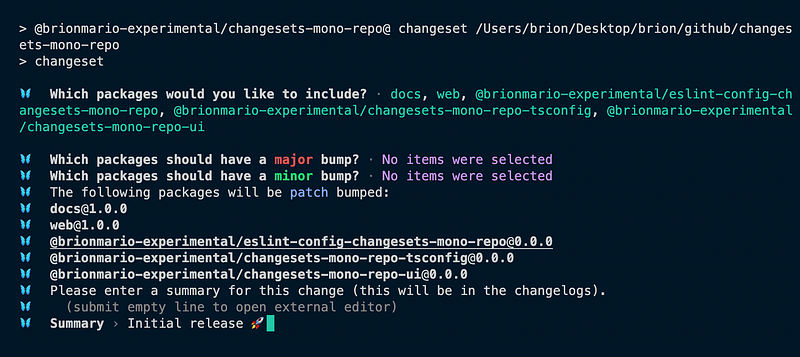
A sample changeset generated from the flow mentioned in the screenshots would appear like the following. The file name would be random.
---
"docs": patch
"web": patch
"@brionmario-experimental/eslint-config-changesets-mono-repo": patch
"@brionmario-experimental/changesets-mono-repo-tsconfig": patch
"@brionmario-experimental/changesets-mono-repo-ui": patch
---

Initial release 🚀
Step 07: Configure GitHub action
Now, let’s set up the GitHub Actions workflow to automate the release process. Here’s how you can do it:
# This workflow will release the packages with Changesets

name: 🚀 Release

on:
  push:
    branches:
      - main
  workflow_dispatch:

concurrency: ${{ github.workflow }}-${{ github.ref }}

env:
  GITHUB_TOKEN: ${{ secrets.GH_TOKEN }}
  NPM_TOKEN: ${{ secrets.NPM_TOKEN }}

jobs:
  release:
    name: 🚀 Release
    strategy:
      matrix:
        os: [ubuntu-latest]
        node-version: [lts/*]
        pnpm-version: [latest]
    runs-on: ${{ matrix.os }}
    steps:
      - name: ⬇️ Checkout
        id: checkout
        uses: actions/checkout@v2.3.3
        with:
          token: ${{ env.GITHUB_TOKEN }}
          fetch-depth: 0

      - name: 🟢 Setup node
        id: setup-node
        uses: actions/setup-node@v2
        with:
          node-version: ${{ matrix.node-version }}

      - name: 🥡 Setup pnpm
        id: setup-pnpm
        uses: pnpm/action-setup@v2.1.0
        with:
          version: ${{ matrix.pnpm-version }}
          run_install: false

      - name: 🎈 Get pnpm store directory
        id: get-pnpm-cache-dir
        run: |
          echo "::set-output name=pnpm_cache_dir::$(pnpm store path)"

      - name: 🔆 Cache pnpm modules
        uses: actions/cache@v3
        id: pnpm-cache
        with:
          path: ${{ steps.get-pnpm-cache-dir.outputs.pnpm_cache_dir }}
          key: ${{ runner.os }}-pnpm-store-${{ hashFiles('**/pnpm-lock.yaml') }}
          restore-keys: |
            ${{ runner.os }}-pnpm-store-

      - name: 🧩 Install Dependencies
        id: install-dependencies
        run: pnpm install

      - name: 🏗️ Build
        id: build-the-mono-repo
        run: |
          pnpm build

      - name: 📣 Create Release Pull Request or Publish to npm
        id: changesets
        uses: changesets/action@v1
        with:
          title: "chore(release): version packages 🦋"
          publish: pnpm publish:packages
          version: pnpm version:packages
          commit: "chore(release): version packages 🦋 [skip ci]"
        env:
          GITHUB_TOKEN: ${{ env.GITHUB_TOKEN }}
          NPM_TOKEN: ${{ env.NPM_TOKEN }}
The 📣 Create Release Pull Request or Publish to npm step is where the magic happens! It utilizes the Changesets GitHub Actions action to create release pull requests or publish to npm based on the Changesets detected in your monorepo. It’s the final and crucial step that automates the versioning and release process, making your life as a developer a whole lot easier. 🦋✨
Step 08: Review and Merge the PR
With the bulk of the work completed, it’s time to have your PR reviewed and subsequently merged.
Sample PR:
feat: introduce changesets 🦋 by brionmario · Pull Request #3 · brionmario/changesets-mono-repo
_🦋 Repository that showcases the utilization of Changesets within a monorepo. - feat: introduce changesets 🦋 by…_github.com
Step 09: Merge the version bump PR
After merging your changes from the previous steps, the Changesets action in the release workflow takes charge to ensure that your requested changes are properly released. It accomplishes this by checking if the PR you just merged contains a changeset. If it detects a changeset, it automatically increments the package versions and generates another PR for your review and final merge.
Once you complete this step, your packages will be accurately versioned, tagged, and released 🎉.
- GitHub Releases: https://github.com/brionmario/changesets-mono-repo/releases
- NPM Release: https://www.npmjs.com/package/@brionmario-experimental/changesets-mono-repo-ui?activeTab=readme
Below is an example of the version bump PR generated by the GitHub action for reference.
chore(release): version packages 🦋 by brionmario · Pull Request #2 ·…
_This PR was opened by the Changesets release GitHub action. When you’re ready to do a release, you can merge this and…_github.com
Changelogs
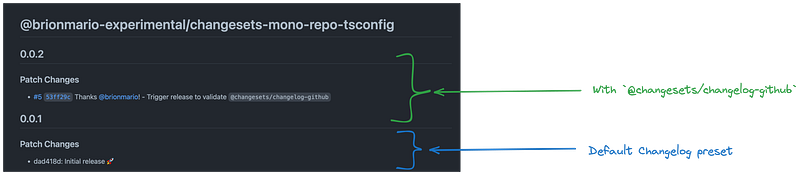
By default, Changesets generates CHANGELOG files in the repository when a release occurs. However, there’s an optional package called @changesets/changelog-github that offers enhanced functionality for GitHub users. This package interacts with the GitHub API to provide richer CHANGELOG entries, including the commiters’ names and hyperlinks to the PRs, among other things.
The following diagrams illustrate the differences between a default CHANGELOG entry and one created with @changesets/changelog-github.
To utilize this plugin, follow these steps:
- Install the
@changesets/changelog-githubdependency.
pnpm add @changesets/changelog-github -w
- Update the
.changeset/config.jsonfile.
{
  "changelog": ["@changesets/changelog-github", { "repo": "brionmario/changesets-mono-repo" }],
  ...// rest
}
Sample PR:
chore: add @changesets/changelog-github by brionmario · Pull Request #5 ·…
_subject_github.com
Conclusion
As we’ve explored in this blog post, Changesets simplifies versioning in monorepos.
The code used in this article can be found at this GitHub repository. Feel free to explore and experiment with Changesets in your own projects.
However, one area where Changesets could improve is its documentation accessibility. As of now, the official documentation exists as Markdown files within the repository itself. While this is certainly useful, it can be more user-friendly to have a dedicated website with interactive features. Fortunately, a kind individual has already hosted the Markdown files, making it easier for developers to access and understand Changesets. You can find these hosted docs at https://changesets-docs.vercel.app/.
Finally, I encourage all of you to explore this innovative technology and consider implementing it in your work and personal projects.
Signing off… ✌️❤️